Introduction
Session is a well understood term for all of us and as per our common understanding, it is (well, less or more) some duration in which entities recognize each other. Some of us might have played with it in ASP.NET as well. The concept is almost similar in WCF although the technique and usage are a bit different.
In WCF, there is always a service class instance that handles incoming service requests. These instances may already be there (at server when request arrives) or may be created as needed. In WCF, the concept of session is mainly to manage these service instances so that server can be utilized in an optimized way. At the server, there is one special class named
InstanceContext that creates/loads service class instance and dispatches requests to it. The correlation can be perceived as: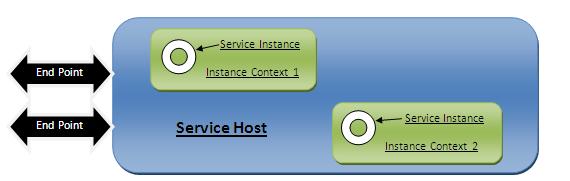
You can see here how stuff is engaged. When some request arrives, it is routed to service instance via instance context. Suppose there is a hit of thousand requests, then service will have to create thousand instance contexts (which in turn will create thousand service instances) to handle these requests. If requests are served in this way, then service is called PERCALL service as each request is served by a new instance context and service instance object (call them as service objects onwards). Consider there is a client that made 100 requests. If service identifies this client and always serves it by a dedicated service object, then this type of service will be known as PERSESSION service as it recognizes the client and serves it by a single instance of service object. On the other hand, if all the requests irrespective of client are served by a single instance of service objects, then the service will be known as SINGLETON service. The following pictures summarize the concept:

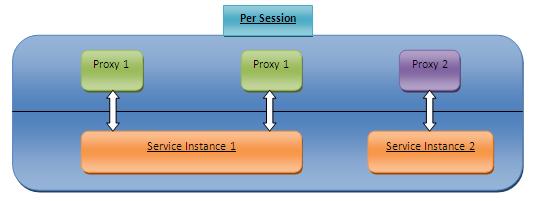

How to Configure Sessions in WCF?
To configure sessions in WCF, one should know the following three elements:
Binding– Because all bindings do not support sessions. Only WS-*, NetTcpBinding andNetNamedPipeBindinghave session support so selection of appropriate binding is necessary.SessionMode– This service contract specifies service’s possible expectation for session from incoming client request. It has three self describing values:Allowed– Service can accept sessionful clients as well as sessionless.Required– Service will entertain only those clients who have session, sessionless client cannot connect to service.NotAllowed– Service can interact only with sessionless clients. Just opposite toRequired.
InstanceContextMode– This is a service behavior that controls instantiation of actual service class. It has the following values:PerCall– Each request made to server will be served by a new instance of service class.PerSession– A Session will have its dedicated service instance and all requests pertaining to the session will be served by that instance only. All sessions will have their individual dedicated service instances.Single–All requests to the service will be served by a single unique instance of service class.
Let’s consolidate this. First a suitable binding should be there which makes the ground to support the session. Then
SessionMode of service contract should be supportive so that service could allow sessionful requests and at last InstanceContextMode should be configured such that it responds in a sessionful manner. The last setting is crucial as it is the only one that decides whether a request will be served by a new service instance or by an existing one. There can be numerous combinations of such settings where one has to judge meaningful ones only. E.g. If you specify session supportive binding, Allowed session mode but specify Per Call instance context mode then there is no meaning of such session as each request will be served by a new instance of service class in spite of all other supports.Let’s Do Some Experiment
Download the attached sample code and follow this article. Doing practical along with theory will make you understand the concept better. In the attached sample code, there are two projects - one a window app and another, a console app. Window project works like a client while another is WCF server. There are two bindings:
- basicHttp and
- NetTcp
The two button handlers call WCF service on two different bindings. At the service side, the called operation analyzes three objects – Instance context, service context and session Id. Here the intention is to check how different objects and session id are created to handle incoming requests. The form application has a label control that displays session id at the client side.
Now run the code and click the Http button. You will observe that there is no session id at form and neither at service side, now click this button twice, see the instance context and service objects are different each time. This scenario depicts Per Call service as service always uses new instance context and service instance. Now click TCP button twice and observe the values at service and at client. You will find the session id is not same at service and client, still the service responds by the same service objects. When the TCP button is clicked, the client makes a request to service over sessionful channel, service accepts this session responds as sessionful service that’s why each request is served by same instance of service object (Instance context + service instance).
There is one thing to understand that unlike ASP.NET in WCF, session id is not mandatorily to be same at service and client. This is because for the two bindings -
NetTCPBinding and NetNamedPipeBinding, WCF identifies the client by the underlying transport channel but for some other bindings (like WSHttp) which uses connectionless HTTP as underlying channel, WCF needs some way to identify the client. In such cases, it adds a new field – Session Id to message header to identify the client. Let’s check this behavior. Replace basicHttpBinding with wsHttpBinding in service’s app.config and update the client with the newer files. Your new endpoint in service’s app.config should look like this:
Hide Copy Code
<endpoint address="pqr" binding="wsHttpBinding"
          contract="wcfservice.Iservice" name="b"/>
Run the app and click on HTTP button twice. You will observe that both client and server have the same session id, instance context and service instance during the two service calls. These objects remained persistent because the default value for
InstanceContextMode is PerSession and default value for SessionMode is Allowed. Therefore a sessionful binding’s session was accepted by service and served by sessioned service objects. To experiment further, let’s decorate our code with these attributes. Your code should look like this:
Hide Copy Code
[ServiceContract(SessionMode = SessionMode.Allowed)]
 public interface Iservice
 {
    //some code…
 }
Hide Copy Code
[ServiceBehavior(InstanceContextMode = InstanceContextMode.PerSession)]
 public class serviceclass : Iservice
 {
    // some code…
 }
When you run the code after these changes and click the HTTP button, you will not observe any change from the previous result. Now change instance context mode to
PerCall, generate new proxy (by svcutil) and update the client. Your code should look like this:
Hide Copy Code
[ServiceBehavior(InstanceContextMode = InstanceContextMode.PerCall)]
 public class serviceclass : Iservice
 {
    // some code…
 }
Run the code and click the Http button twice, you will notice that this time always a new pair of service objects is created to serve the request. The same will happen even if you click the Tcp button. Now just make the
InstanceContextMode to single. Your code should look like this:
Hide Copy Code
[ServiceBehavior(InstanceContextMode = InstanceContextMode.Single)]
 public class serviceclass : Iservice
 {
     // some code…
 }
Now run the code and click both the buttons. This time you will see that both Tcp and Http requests are served by the same service objects. This is because
InstanceContextMode.Single configures the service to serve all the requests by same service object.
I hope the concept covered so far is clear to you. Sometimes you can derive the result yourself even without running the code by just analyzing the value of different configuration of
SessionMode and InstanceContextMode property. I would recommend you to make some more random configurations and just play with it to make the concept clearer a bit more. [Do remember that by default, InstanceContextModeis PerSession and SessionMode is Allowed. If the underlying binding is not supportive to session, then though having sessionful the service responds as Per call.]Demarcation of Operations
Demarcation is to annotate service operations by some special attribute to determine the first and last operation in their execution order. Consider a service having 4 methods/operations named-
SignIn(), GetDetails(). TransferFund() and SignOut(). In such a scenario, a user must be signed in and then try to fetch details and do transfer. If user signs out, then he should not be allowed for further requests until he signs in. To configure such type of execution order, Demarcation is required. There are two attributes:IsInitiating(Default -True)IsTerminating(Default –False)
These attributes decide which operation should be called first and which should be last? For the above four operations, following can be one possible sequence:
Hide Copy Code
[OperationContract(IsInitiating = True)]
 Bool SignIn()

[OperationContract(IsInitiating = false)]
 String GetDetails()

[OperationContract(IsInitiating = false)]
 Bool TransferFund()

[OperationContract(IsInitiating = false, IsTerminating = True)]
 Bool SignOut()
Here initiation and termination refers to a session which is mandatory for demarcation, as service needs to know whether client has followed the particular sequence or not. Here operation 2,3 and 4 are set to
IsInitiating = false so cannot be called first but can be called after an Isinitiating = True operation is called. Similarly, Operation 4 is annotated as IsTerminating = True that’s why when it is called, it terminates the session (along with underlying channel) and then client cannot make further calls until a fresh proxy is created and an IsInitiating = True operation is called. To use demarcation, the following configuration is necessary:- A session supportive binding
SessionModeset toRequired
When
IsTerminating operation is called, WCF discards the channel and never accepts further messages from it. If an operation is not decorated explicitly with any of these attributes, then default value of these attributes will be applicable to it.
That’s all for now.
At last, just recapitulate once - There are 3 things to remember for WCF session:
SessionfulbindingSessionModeservice contractInstanceContextModeservice behavior
Demarcation defines first and last operation in execution order.
WCF session is somewhat different than ASP.NET sessions in the following ways as in WCF:
- Sessions are created and terminated by clients.
- Server does not use session to store some general data.
- Session does not heavily rely on Session Id, a group of messages having particular field in their header or body can also be considered part of session.
- Session Id may not be same at client and server.
Hope this small article has given you some brief idea about WCF session and now you can feel some base for further reading. Please do some experiments on your own and refer to MSDN for in depth analysis of the concept.
Please let me know if something is missing or needs correction as it will be helpful for all of us.
You can refer to my other article here for WCF transaction.


